December 19, 2009

Bread Baking with Miss G

I have a good friend who has encouraged my bread baking in many ways. Little did I know that she longed to learn to bake bread herself. One day I found that out and so we decided to devote the better part of a day so that I could teach her how to bake yeasted bread.

Baking two kinds of breads in one day requires a bit of organization, but we wanted to make dinner rolls and something sweet, so we got started at 10 am. First we made the wheat dough for the rolls and started it proofing. I'm rarely envious of things (as opposed to experiences) but I am envious of my friend's convection wall oven with a proofing setting...it worked so well and made life much easier since it was the perfect temperature for proofing the dough.

The recipe we used for the dinner rolls is the same one I made for my afternoon with Sparkle Plenty and Arcadia. The dough is very easy to work with, which made it perfect for teaching Miss G how to handle the dough for rolls. The knots are very easy to do and they had great oven spring, a wonderful brown crust, and were much better looking and tasting than any rolls I've made. Beginner's luck or a natural talent for baking...I think the latter.

When we made the wheat dough I had Miss G note how the yeast looked when it had 'proofed' in barely warm water. Once the dough was kneaded by the stand mixer, I had her feel it and knead it lightly before it went into the rising bowl. Seeing and feeling the different parts of the process go a long way toward feeling comfortable enough to bake some bread on your own...at least I hope it works that way. This was my first time trying to teach how to make bread, so it remains to be seen how well I did.

Once the wheat dough was in the proofing oven, ready for its initial rise, we washed up, then began the sweet dough for a large and impressive braid, full of dried cranberries and orange zest and walnuts. I've made this bread before, so I knew that it would be both easy and a knock out!
This time the dry yeast was combined with the dry ingredients and not rehydrated first in water. This dough goes together really easily and smells so good with that pungent orange zest! By the time it was ready for its first rise, the wheat dough had doubled in size and was ready to shape. We used a lightly oiled bowl and plastic wrap covering for each kind of dough for the initial rise.

Once the wheat dough was punched down, Miss G pulled it out of the bowl and on to a lightly flour marble slab. We used a bench scraper to divide the dough into 9 pieces. I told her that if you needed exactly the same amount of dough in each that you could always weight the pieces to make sure, but we decided to eyeball the divisions. Shaping each piece into a rope took a little time. Making the knot also took some practice, but soon we had nine lovely knots. We covered them with a towel and let them double in size while we had a well-earned lunch.

After lunch the rolls were ready to bake. As noted above, they baked up into gorgeous and delicious rolls. While they were baking we took the sweet dough out of the proofing oven, punched it down (Miss G was getting good at that, too) and divided it into thirds with the bench scraper.

Each third was shaped into a long rope. I found that squeezing the dough in the middle got the rope started forming and then it was like working with play-doh.

Once the ropes were made, with one slightly longer than the other two, they were moved to a silicon mat lined baking sheet where we braided then just as you would plait hair. Now the towel was placed on over the braid and it was set aside to double in size.
By now the rolls were done and the kitchen smell all nice and yeasty and of freshly baked bread! We brewed up some tea and shared one after it had cooled slightly. It was great with some butter but even better with a bit of bitter orange marmalade! When Miss G's hubby came home he enjoyed a fresh roll, too.
The braid had doubled in bulk by then, so we glazed it with beaten egg,


sprinkled on some sugar and put it in the oven.

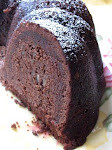
The braid baked while we cleaned up. It, too had wonderful oven spring and it was so large that it stretched the length of a half sheet pan! Once baked it was a sight to behold, all golden brown and puffed. (See photo at top of post) You could see bits of the cranberries and walnuts peeking out of the crust. I had made a point to have Miss G tap on the loaf before it should have been done, 5 minutes later, and then 5 minutes after that when it was done so that she could hear the difference between almost baked and fully baked.

All in all it was a super fun day and some great bread was made, conversations and laughter shared and new skills developed. We are already talking about another bread baking day in January! You'll want to come back and see what we make.
Happy holidays to you and yours! May your days be merry and bright and full of the smells of bread baking and being eaten with enjoyment!
XOXO Elle

Cranberry-Walnut Bread
from the Apple Pie, Patis, and Pate’ blog
makes one braided loaf, the shaped bread will fit on a half-sheet pan

Dough Ingredients:
Ingredients Volume
bread flour 3 cups
granulated sugar 3 tbsp
salt 1/2 tbsp
instant yeast 3 1/2 tsp

orange zest 3 tbsp
large eggs 2
whole milk 1/2 cup
butter, melted 2 tbsp
water 1/4 cup
dried cranberries- 1 1/2 cups
coarsely chopped walnuts 3/4 cups

1 whisked egg, for the egg wash

Instructions:
Mix Stir the flour, sugar, salt, and yeast together.
Add the orange zest, eggs (lightly beaten), whole milk (at room temp.), butter, and water(at room temp.).
Mix until a shaggy ball of dough is formed.

Knead 5 to 6 minutes – OK to use stand mixer

Rest 5 minutes

Knead On a lightly floured surface spread out the dough in a rough rectangle by pushing down on it. Add the cranberries and walnuts.

Gently fold the dough over itself until the cranberries and walnuts are evenly incorporated.

Bulk Ferment - 2 hours at room temperature

Shape three-braid (as shown), boule, or batard.

Final Proof 60 to 90 minutes at room temperature while uncovered,
or until almost doubled in size
Preheat the oven to 325 degrees F.

Egg Wash - Glaze the braid with the egg wash

Bake Bake for 50 to 55 minutes at 325ºF, rotating the loaf halfway through baking if necessary. The center of the loaf will register 185ºF to 190ºF when done.

Cool At least 1 hour

URL: http://www.applepiepatispate.com/bread/cranberry-walnut/

November 28, 2009

Three Related Breads


It's been so long since I posted here! There has been bread baked, but the recipes were not written down and the memory of them got lost in the swirl that has been my life for the last two months or more.

The good news is that a number of family members, including my Mom, came to visit mid-November and I made them some bread. When the first loaf was inhaled by those who will not be named so that Mom didn't even get a piece, I made it again in a slightly different version so that she could enjoy it. It was such a hit that I sent a braided loaf, this time with seeds added, to River City...and some of it actually made it to my brother on the East coast!

I have now had requests that the seeded one be sent for Christmas presents. Might happen...depends on if time allows...and that has been in short supply for optional things of late.

All three loaves contained whole wheat flour, barley flour, and unbleached bread flour. The first one also had some oats and the last one had seeds but the recipe was largely the same. I baked the second one a bit longer than usual, but we liked the extra crustiness that resulted. I think I also forgot to glaze that loaf...it was still delish.

The dough is soft and easy to work with and yields loaves that have a good crumb and tasty enough to eat without butter. I confess, my favorite thing to do was take a slice, toast it, butter the toast and add a little jam....yum! I never did taste the seeded one but was told that it was the best of the three.

The recipe is a little confusing unless you look at it as A) The Sponge - 2 versions, B) The Mixing and First Rise - pretty much the same for all versions, and C) The Shaping and Baking - 3 versions, although the only difference between Second Way and Third Way is that the latter has seeds added. Does that help? Guess not, but it's the best I can do.

Three Way Barley Wheat Bread


First Way - The Sponge:

Cook 1/4 cup steel cut oats in 3/4 cup water according to package directions. Cool. To that add either 1 cup sour dough starter or 1 package active dry yeast which has been proofed for 5 minutes in 1/4 cup barely warm water. Break up the cooked oats. In another bowl, whisk together 1/2 cup all purpose flour and 1/2 cup barely warm water. Add to the cereal. Whisk it all together, cover with plastic and let sit overnight in a warm place.


Second Way and Third Way - The Sponge:

Whisk together 1/2 cup all purpose flour and 1/2 cup water. To that add either 1 cup sourdough starter or 1 package active dry yeast which has been proofed for 5 minutes in 1/4 cup barely warm water. Whisk to combine. Cover with plastic and let sit overnight in a warm place.

ALL Three Ways - The Mixing and First Rise:

The next morning take the sponge that has been sitting overnight and put into the bowl of an electric stand mixer fitted with a dough hook. Set aside.

In a large Pyrex measuring cup or in a bowl, whisk together 3/4 cup warm milk, 1/3 cup brown sugar, 2 teaspoons salt and 2 tablespoons soft butter. Set aside.

In another bowl, whisk together 1 cup barley flour, 1 cup whole wheat flour (I used whole wheat pastry flour), and 2 cups unbleached bread flour. Set aside.

Add the milk mixture to the sponge mixture in the mixing bowl. Blend with the mixer for a few minutes. Add 1 egg, beaten and blend with the mixer for a few minutes. With the mixer on a low setting, gradually add the flour mixture, letting the dough climb the dough hook. Continue to add small amounts of flour until a soft dough forms and the dough cleans the sides of the bowl. You may need additional bread flour...that's OK. let the mixer knead the dough for 5-6 minutes until silky.

Turn dough out onto a lightly flour surface. Knead a few times, then shape into a ball. Oil a bowl or dough rising container, then oil the whole surface of the dough ball by turning it in the oiled bowl or container. Cover loosely and place in a warm place to rise until doubled in bulk, about 2 hours.
Punch down risen dough and turn onto lightly floured surface. Knead a few turns to get rid of big air bubbles.

First Way- Shaping and Second Rise and Baking:

Flatten dough into a rectangle, roll up jelly roll fashion, tuck ends under and place in a greased bread loaf pan. Cover and let rise in a warm place until doubled in bulk, about 1 1/2 hours.

Preheat oven to 350 degrees F. Uncover loaf and discard plastic, if using. Bake risen loaf in oven until golden brown and until loaf sounds hollow when tapped, about 40 -50 minutes. Turn out of loaf pan and let cool on wire rack. Makes one loaf of Oatmeal Barley Whole Wheat Bread.

Second Way - Shaping, Second Rise and Baking:

Flatten dough into a rectangle. Using a bench scraper or sharp knife, cut dough into three equal pieces. Take each piece and roll it under your palm to make a rope about 15 inches long. Place the three ropes side by side on a parchment or silicon mat lined baking sheet and braid.(I usually start the braid in the middle, braid out to one end, then start in the middle and braid out to the other end.) Tuck ends under, cover and let rise in a warm place until doubled in bulk, about 1 1/2 hours. Preheat oven to 350 degrees F. Uncover loaf and discard plastic wrap, if using. Brush loaf with a wash of 1 egg beaten with 1 tablespoon water. Bake until golden brown and until loaf sounds hollow when tapped, about 40-50 minutes. Place braid on a wire rack to cool. Makes one Braided Barley and Whole Wheat Loaf.


Third Way - Shaping, Second Rise and Baking:

Flatten dough into a rectangle. Sprinkle on over whole surface 1 tablespoon mixed seeds (I use King Arthur Flour's Harvest Grains Blend which also contains some grain flakes). Roll up jelly roll fashion, then bring ends up and to middle of roll. Flatten dough into a rectangle again, again sprinkle on 1 tablespoon of mixed seeds, again roll up jelly roll fashion, again bring ends up and to the middle of the roll. Repeat two more times, for a total of 1/4 cup (4 tablespoons) of seeds. Knead about 10 turns to further distribute the seeds. Divide dough into 3 equal parts with bench scraper or sharp knife. Follow directions for Second Way to shape into a braid on a parchment or silicon mat lined baking sheet. Let rise as described in Second Way. Glaze as described in Second Way and bake the same way. Makes one Braided Barley Whole Wheat Seeded Loaf.


So there you have three related breads. They all have the barley and wheat and one has oats and the last has seeds. One is a sandwich loaf and two are braids, although any could be sandwich loaves or braids or even dinner rolls...just different shaping to do that. This dough is a pleasure to work with and delicious once baked...in all three versions.

October 15, 2009

World Bread Day 2009 - Yes we BAKE!

When World Bread Day came around last year, this blog didn't even exist. It is the product of my obsession with baking bread...I think of it as an adjunct to my original blog, Feeding My Enthusiasms. I was just at the beginning of my sourdough starter journey last October. Although I had baked yeasted breads in the past, I didn't think of myself, at all, as a bread baker. Poor Xam wasn't yet the Bread Baker's Dog. He is sure glad that I'm now a regular bread baker :)


The ROUNDUP can be found at 1x umruhren bitte.You can go there to learn more about World Bread Day and Bread Baking Days, too.

A constant source of inspiration is the Yeastspotting event, mostly hosted by Susan at Wild Yeast blog. Every week there are wonderful yeasted breads, rolls, flatbreads, sweet breads and more.

Now that my sourdough starter from last October has gone bad, I'm making a new one, but that means that I'm using packaged yeast for recipes this month. With the holidays coming up, I've been spending time looking at The Festive Bread Book by Kathy Cutler. That is where I saw the illustration for making this bread, although I chose to use a different bread dough. This is a fun one ladies and gents...like playing with clay, only it's softer.

A third of the dough was used in a bodacious chocolate and vanillia swirled snail loaf. That recipe can be found here on Feeding My Enthusiasms blog.

See that line of white milk bread? It sure helps temper the richness of all that chocolate!

The other two thirds were used for this lovely, soft and sweet milk bread for World Bread Day!

Harvest Sheaf

This bread is shaped like a sheaf of wheat. It would make a great addition to a fall buffet table or for Thanksgiving breakfast or dinner.

With quince jelly and a little butter, it is amazing!

I used 2/3 of the Milk Bread recipe from The Italian Baker by Carol Field to make the Harvest Sheaf. You can find the recipe at the bottom of this post and also, along with one for a yummy Chocolate Bread, HERE.


Shaping the Harvest Braid (diagram and recipe at the bottom of this post):


Make the Milk Bread dough as it is given in the recipe.

After the first rising, punch the dough down. You have to approximate the amount of dough needed for each of the following, but the Milk Dough is so easy to work with that you can pinch off some if you have too much or add a bit from another ball of dough if you don’t have enough.

Roll dough into ropes, each about ½ inch thick: four 5-inch ropes, eight 13-inch ropes, eight 16-inch ropes. You may need to make the longer ropes 10 inches and 13 inches respectively … by the time I was making this bread I wasn’t into measuring…I just made eight long ones and eight shorter ones, plus the four very short ones became three very short ones.

Start by putting a silicone mat or parchment paper on a large baking sheet.
The first layer has the ropes touching, starting from the center and moving left and right, with a bend about a third of the way down, four bending one way and four the other.

The next layer has six of the shorter ropes, touching, placed on top of the first set of ropes, half of the ropes bending one way and half the other, about a third of the way down from the top.

The final two ropes are placed on top of that with one bending one way and the other bending the opposite way. I think I actually put one of the long ones almost upright to fill in the sheaf top. I think I spread mine out too much, so the top was pretty, but seemed too flat in comparison to the stacked bottom part.


Take the four (or three) short ropes and twist them together (two twists if you have four ropes, one twist of three strands if you have three like I did). Place the twisted rope across the ‘sheaf’ about half way down. As if it were securing the sheaf together. Tuck the ends under.

Take sharp scissors and snip along the bent portion of the stalks to simulate wheat grains.

Cover and let rise in a warm place until double – about 30 minutes. Make glaze of one egg beaten with 1 tablespoon of water. Brush over the whole loaf.

Bake in a preheated 375 degree F oven for about 25 – 30 minutes or until golden brown. Cool on a wire rack.

This bread is slightly sweet and milky and very mild in flavor. It is great with butter and jam.

Milk Bread

SPONGE:
1 ¾ teaspoons dry yeast or 2/3 small cake (12 grams) fresh yeast
1 tablespoon sugar
½ cup warm milk
1 cup less 1 tablespoon (130-135 grams) unbleached all-purpose flour
Stir the yeast and sugar into the milk in a large mixing bowl or mixer bowl; let stand until foamy, about 10 minutes. Add the flour and whisk vigorously to make a thick batter. Cover and let stand until doubled, less than 1 hour.

DOUGH:
1 egg 1 tablespoon rum
1 cup milk, room temperature
½ stick (55 grams) unsalted butter, room temperature
2 ¾ cups (175 grams) unbleached all-purpose flour
1 teaspoon (5 grams) salt

Add the egg, rum, milk, and butter to the sponge and mix with the paddle for about 1 minutes. Add 1 cup of the flour and the salt and mix on low speed. Change to the dough hook and add the rest of the flour and knead until soft, silky and elastic, 3 – 4 minutes once the flour is incorporated. Finish kneading briefly by hand on a lightly flour surface.

Place the dough in a lightly oiled bowl, cover tightly with plastic wrap, and let rise until doubled, 1 to 2 hours. The dough should be very soft but slightly tacky, and if you pinch the surface, the little peaks of dough should hold their shape.

Cut the dough into three equal pieces. Take one of the pieces and use it for the Chocolate-Vanilla Swirled Snail Loaf, found HERE, or make a round loaf with it, pulling the dough under to form a 'skin', then cover with plastic wrap and let rise until doubled. Bake it along with the Sheaf, on a separate baking sheet.

Form the Harvest Sheaf with the 2/3 left, using this diagram and the instructions above.

October 03, 2009

Friendly Fun Fougasse

Bread Baking has been low on the list of priorities of late. The last post here was in August and it is already October 5. I've been reading a lot of bread recipes but not baking. Time to change that. Some days the words just don't flow, so if this post seems to need something, believe me I feel that way, too...maybe some salt?

A few months ago I was lucky enough to be in Seattle at the same time that Tanna of My Kitchen in Half Cups was visiting. She kindly asked me to join her when she met with Lynn of Cookie Baker Lynn. Lynn lives in the Seattle area so she knew of great chocolate places as well at a wonderful bread store/cafe'.

One of the fun things to do with bloggers is to exchange goodie boxes. Cookbooks are a fun thing to send and receive. Recently a cookbook found it's way to me from Lynn and I had a great time looking at all the recipes. Today I finally had time to make one of the breads in the book. The book is called Basic Baking: Flavored Breads by Linda Collister. There are dozens of delightful breads. I decided to start with the Bacon and Walnut Fougasses in the Mediterranean Flavors section. Thank you Lynn!

I've never made fougasse before but have long been intrigued by the way that you slash the bread in a sort of herringbone or ladder shape. It is a kind of flatbread, similar to foccacia. I liked that the crust was not too thick or firm and that some crust formed in the slashed areas.

This is the time of year when the walnuts are falling fromt he tree and making a loud thunk when they hit our deck. Walnuts are a great fall ingredient and since the gougasses are flat, the walnuts get toasted while baking. The walnut flavor was just strong enough, but the bacon flavor was faint in the four I made with bacon. It's possible that it would be better with a different kind of bacon than the one I found in the fridge.


Walnut Fougasses (some with Bacon)
Makes 8 pieces

“These attractive, oval, individual loves come from Provence where, these days, they are made plain or flavored with olives, herbs, charcuterie, or even candied fruit. Use top-quality bacon…”

I changed the recipe a bit by using whole wheat flour for some of the flour and by using dry yeast instead of cake yeast. If you wish to you cake yeast, e-mail me and I’ll send you the recipe for using compressed cake yeast.

1 tablespoon olive or vegetable oil
5 oz. rindless bacon, finely diced
2/3 cup walnut pieces, coarsely chopped
3 cups unbleached white bread flour
1 2/3 cups whole wheat flour
2 teaspoons sea salt
1 package active dry yeast – I used quick rising yeast
1 ¼ cups lukewarm water, divided
1 egg beaten
3 tablespoons olive oil
extra flour, for dusting
extra oil, for brushing
several baking trays, greased or lined with silicon baking mats or parchment paper

Heat the oil in a skillet, add the bacon, and saute’ until golden and crisp, but not hard. Drain on paper towels, then combine well with the walnuts. (If your bacon is very fatty, you can probably skip the extra oil in the pan…I did)

Put the flours in a large bowl, mix well. Remove one cup and set aside. Mix the salt into the larger bowl of flour, then set that aside, too.

Sprinkle the dry yeast over ¼ cup of the lukewarm water in a small bowl. Let sit 10 minutes to hydrate and proof.

Make a well in the center of the flour/salt mixture. Into the well pour the yeast mixture, the rest of the lukewarm water (1 cup), the beaten egg and the olive oil. Gradually work in the flour to make a soft but not sticky dough. Use additional flour, 1 tablespoon at a time, from the reserved one cup to make the dough the right consistency to knead.

Turn the dough out onto a lightly floured work surface and knead thoroughly for 10 minutes, adding additional flour from the reserved flour if needed. When finished dough will feel fairly smooth, very elastic, and silky.

Place the dough in a lightly oiled bowl and turn it over so the entire surface is lightly coated with oil.

Cover with a damp cloth and let rise at room temperature until doubled in size – about 1 ½ hours. Punch down the dough, then turn out onto a lightly floured surface. Knead in the bacon and nuts until evenly distributed.

Weigh the dough and divide into 8 equal parts.

Using a rolling pin, roll each piece into an oval about 8 ½ by 5 by ½ inch. With a sharp knife, cut about 8 slits in a herringbone pattern in each oval. Arrange them, spaced apart, on the baking trays.

Lightly cover the baking trays with a damp cloth and let rise at cool to normal room temperature until doubled in size – about 45 minutes.

Preheat oven to 400 degrees F. Uncover the fougasses and lightly brush with oil. Bake for about 15 – 20 minutes until golden brown. Cool on a wire rack.

I made half of these with only the walnuts because I thought we were out of bacon, but later discovered that we had some bacon, so the second batch of 4 were made with the bacon. Although they were fine with just walnuts, the bacon added an extra dimension. Next time I would use a different kind of bacon...something drier and more intensely flavored. If you want to omit the bacon, I would add some herbs to add additional flavor…perhaps some minced fresh rosemary or parsley.

These are nice because each fougasse is a good size for one person and the slashed make they interesting visually, too. I didn’t pull at the rolls once the slashes were made to open up the holes for the first batch without the bacon, so they closed up a bit during the second rise. Sweetie liked them that way, but I like crust so I made the spaced larger for the bacon ones which gave a better crustiness around the slashes in those loaves. You can make them either way depending on how much crust you like. You can also omit the whole wheat flour and use only white flour as the original recipe suggests. I like the additional grain flavor that the whole wheat flour adds, but all white flour would be more refined.

These are fun loaves to make due to the visual interest, the nice crust and chewiness. They make a nice addition to the bread basket and are especially nice warm, with some good butter. They taste lovely toasted, too.
I've been missing the weekly wonderful event that is Yeastspotting at Susan's Wild Yeast...no time to even go there and drool over the bread being baked by the fantastic bakers featured there...so it's nice to have an entry again...and time to bake bread. Here is the URL for Susan's blog :http://www.wildyeastblog.com/

August 23, 2009

Sourdough Again

After over three months hibernation, the sourdough starter that I froze before we left for Ireland has been thawed, fed twice and made ready for action. The onset of ripe heirloom tomatoes led me to crave a sourdough sandwich with crisp bacon, ripe heirloom tomatoes and crunchy bacon.


Although there are dozens of regionally produced sourdough breads available to buy, without too much trouble, making my own means that I can add whatever I like to the dough and not pay a king's ransom for the results. The fact that the Straight Shooter Man recently gifted me with not one, but two...two! freshly milled flours added to the fun. He visited the Bale grist mill in Napa on a photo shoot and bought both the whole wheat bread flour and the spelt flour that they milled on site with old French mill stones.

I started with one of the first Sourdough Bread recipes I used when my starter was brand new last fall. Now that I have a better sense of how to bake bread with a starter, I only used the recipe for a general guide and quickly went down a different path.


The flour bowl contained a mixture of unbleached bread flour, 12-grain flour, whole wheat bread flour and spelt flour. For additions once the kneading was finished I lightly toasted walnuts, pumpkin seeds, and sunflower seeds. Although that looked good, I also toasted a rolled grain mixture I use for muesli. It has barley flakes, triticale flakes, wheat flakes and oat flakes.


There was no addition in this bread of a sweetener like honey or molasses or brown sugar, nor any butter or milk.

Although it might be too late for this week, I'm sending this over to the host of Yeastspotting, that weekly wonderland of inspiration for yeast lovers, hosted this week by Susan (I think). Do go by and check out all of the wonderful entries.

Sourdough Multigrain with Seeds

2 cups all purpose unbleached flour
1 cup 12 - grain flour (or use additional wheat flour)
1/2 cup whole wheat bread flour
1/2 cup spelt flour
1 cup sourdough starter
1 1/2 cups lukewarm (70 degree F) water
1 tablespoon salt
additional bread flour as needed
1/3 cup sunflower seeds, toasted
1/3 cup pumpkin seeds, toasted
1/3 cup mixed grain flakes (rolled grain), toasted
1/3 cup chopped walnuts, toasted

In a large bowl mix the all purpose flour, 12 grain flour, whole wheat flour and spelt flour together to combine.(I used a whisk to whisk them until combined.)

Put the starter, water and 1 cup flour mixture in the bowl of a stand mixer and whisk to make a smooth batter. Use the paddle or dough hook with mixer on a low speed to work in additional 1 1/2 cups flour mixture. If not using dough hook, change to dough hook at this point. Add rest of the flour mixture to the dough, 1/2 cup at a time with the mixer on a low speed. Let the mixer knead the dough for about 5 minutes, or until dough is elastic, or turn the dough out onto a floured board and knead in the rest of the flour then knead for 5 minutes until the dough is elastic.

Let the dough rest 5 minutes, then push down with the palms of your hands to spread it into a rectangle approximately 10 inches by 12 inches.

Mix the seeds, grain flakes and walnuts together. Spread half on the rectangle, leaving an inch uncovered around the edges. Roll up like a jelly roll, then fold the two open ends into the center of the dough roll. Again push down into a rectangle, spread the other half of the seed mixture over it, leaving an inch uncovered on all sides, roll in jelly roll fashion, fold in the ends and knead a minute or two to distribute the seed mixture even more.

Lightly coat a 4-quart mixing bowl with oil and transfer the dough to the oiled bowl. Turn the dough over once so that the top of the dough is lightly coated with oil. Cover the mixing bowl with a loosely applied layer of plastic wrap and allow the dough to rise at room temperature, until it has doubled in bulk, at least 8 hours, preferably overnight.

Press the air out of the risen dough and gently knead it until it is springy again, The dough will have a smooth, flexible 'skin', although some seeds may poke through.

Divide the dough in half. Working with one half at a time, shape the dough into 2 balls, tucking the cut edges of the dough into the center of the balls, and stretching the 'skin' over the surface of the dough balls. Try to do that without tearing the 'skin'. This is hard to do with all the seeds. If a few pop through, don't worry about it.

Put the balls of dough on a baking sheet lined with a silicone pan liner or bakers' parchment. Loosely cover the loaves with plastic wrap and let them rise until they are doubled in size, about 4 hours.

Put a baking sheet on the bottom rack of the oven and put a second rack one position above it. Pour a 1/2 inch layer of water into the baking sheet on the bottom shelf. Preheat the oven to 450 degrees F. Just before putting the loaves in the oven, use a box cutter or a very sharp knife to cut shallow slashes in a cross over the surface of the loaves, about 1/8 inch deep. Bake the loaves until they are well browned and sound hollow when tapped, about 35 minutes. An instant read thermometer inserted into the center of a loaf will register 200 degrees F.

Transfer the baked loaves to a cooling rack and let them cool to room temperature before slicing.

Bakers dog news: Xam had stitches removed on Friday and he is like a young dog again, running around and even chasing his tail! Still has the grey muzzle and eyebrows to let us know the truth, but he has a spring to his step when we take walks that hasn't been there for months. Yay! Thanks for all your good wishes...I know it helped. Hugs, Elle

August 11, 2009

Doggy Update

Big smiles around here tonight. We heard from the vet and test results are great...no cancer and all is OK. Xam will go back in a little over a week and get the stitches out. Right now he is getting antibiotics and lots and lots of affection and hugs!

August 08, 2009

Chunky Bread and Bread Bakers Dog Updates

If you have been following my other blog, Feeding My Enthusiasms, you'll know that I have had dental (gum) surgery and have been on soft foods for over a week. It gets old. It is also difficult to get up much enthusiasm for baking a nice, crusty bread when you won't be able to eat it. Doing better, but still mostly eating soft foods. By next week I'll be back to sterner stuff.

Today I did bake two nice loaves of fresh, fragrant bread because Sweetie really, really deserved some bread and this is the one he requested. He put up most of the signs for a Yard Sale that the P.E.O. chapter I belong to is holding today to raise money for scholarships for women. Over an hour last night and about the same this morning (staring at 6:30 am!) certainly earned him something special from the oven. He followed that up with about 6 hours of tree trimming and then chipping the branches trimmed, with liberal assistance from Straight Shooter from SF.

This bread is also by way of a thank you to Straight Shooter from SF because he returned from a photo shoot to Napa last weekend with some freshly ground wheat bread flour and spelt flour. I used a cup of the whole wheat flour in the bread and as I was kneading it I could really smell the sweetness of fresh grain.

This bread is a variation of the asparagus bread that the Bread Baking Babes made in June. I substituted 1/2 cup cubes, roasted zucchini for the asparagus. I used 1/2 cup fresh Swiss chard (cut in chiffonade, steamed, drained and squeezed dry, then measured) instead of the arugula in the original recipe. I used 1 cup of the freshly milled whole wheat bread flour and three cups of unbleached white bread flour. Because tomatoes are late to ripen but the basil is going gangbusters, I added 1/4 cup minced fresh basil. Zucchini doesn't have the assertive flavor that asparagus does, but the basil not only smells wonderful, but adds great herby taste to the bread. Otherwise the recipe is the same.

This makes a moist, flavorful, chunky bread, full of veggies, nuts and Parmesan. The crumb is soft and fairly tight and the crust is good, although not as good as last time when I used the sourdough starter. I did add steam a couple of times, but didn't open the oven door...already too hot in the house! The loaves are a bit on the flat side, partly because I think I let them rise too long for the second rise and partly because the plethora of veggies makes it hard to have a good 'skin' of dough to hold the loaf higher.

I'm sending this lucious bread over to Yeastspotting, one of the best places to see what other bakers are doing with yeast bread! Check it out!!

Update on Xam: He had surgery this past Thursday to remove a large mass back to the left of his spine by his tail. A fluid biopsy a few days earlier had shown infection, but not cancer, so we have our fingers crossed...won't hear until Tuesday. He is in good spirits and doesn't seem to have noticed the 30 stitches on his rump! He ate bits of this bread with great gusto!


Asparagus (Zucchini) Bread
(with Parmesan Cheese and Walnuts - 2 small loaves)

125 g green asparagus (I used 1/2 cup diced, roasted zucchini instead)
25-30 g rocket (I used 1/2 cup Swiss chard instead)
1/4 cup minced fresh basil
50 g walnuts,
50 g freshly grated Parmesan cheese
450 g strong bread flour (you can also use half whole wheat and half white or white whole wheat if you can get that) (I used 1 cup whole wheat bread flour and 3 cups unbleached white bread flour)
12 g fresh yeast or 1 1/4 tsp dry instant yeast
250-270 g water (whole wheat version may use a little more water)
25 g olive oil
10 g (sea) salt

Boil 3/4 liter of water with a pinch of (sea) salt. Clean the asparagus, set two of them aside, cut the rest into 4 pieces. Boil these pieces for 2 minutes in the water, scoop them out (so you can use the water for the rocket as well) and rinse under cold water (to stop them cooking).

Put the rocket in the boiling water for a few seconds (until wilted), drain and rinse under cold water and drain again. Press the water our of the rocket, chop it coarsely and but the asparagus into 1/4 inch (± 1 cm) long pieces, set aside.

Crush the walnuts coarsely and grate the Parmesan.

Measure the flour and yeast in a large bowl, mix in most of the water and knead for a few minutes (on low speed), add the olive oil and knead for 10-12 minutes. Add the salt and knead on medium speed for 5 minutes until very elastic.

Let the dough rest for 10 minutes. Work the asparagus pieces(zucchini pieces), rocket(Swiss chard), walnuts, basil and Parmesan in with care so that they're evenly distributed. The dough should be very supple and elastic, hence the long kneading time. For me the best way to incorporate all the ingredients is to spread the dough out into a large slap, sprinkle all the ingredients on and roll it up. Let it rest for 5-10 minutes, press flat and fold... rest 5-10 minutes press flat and fold. Shape into rounds.

Place the dough in a greased container, cover and let rise for about 2 hrs.

Divide the dough into 2 equal parts.
Make round balls, cover with a tea towel and let rest for 10 minutes.
Flatten the balls and fold into taut breads with slightly tapering ends. Lay one asparagus in lengthwise in the middle of the bread and press in slightly. Sprinkle with wheat flour and cover to rise for 70 minutes or until doubled. Before baking you can sprinkle a little grated cheese on the bread if you like (optional).

Preheat the oven (preferably with stone) to 460ºF.

Place the loaves directly on the stone. Spray with water (or poor some hot water in a metal container on the bottom of the oven that you preheated to create steam)
Lower the temperature after 5 minutes to 400ºF. Open the door after another 10 minutes to let some air in. Repeat twice during baking. (I must admit I forgot about this step)
Bake for 40-45 minutes and cool on a wire rack.

July 12, 2009

Bread Baker's Dog Returns with Zucchini Cheese Bread

Xam, the Bread Baker's Dog, is finally doing well. His infection has cleared up after three full weeks of antibiotics, twice daily warm compresses, and lots of love, affection, and vet bills. Since he found the compresses a bit uncomfortable, after the first two times he knew when it was happening and refused to cooperate. Since bribery works, he soon found that the compresses were accompanied by doggie cookies to munch on. It's also called positive reinforcement, but truly it was bribery. Come sit on Sweetie's lap while Mom presses a warm towel where it already hurts. The joys of dog ownership!

The other good news is that his appetite is back...Sweetie's never left...so it's time for bread baking. Since the zucchini continue to be fruitful and multiply and fill the platter on the table, it seemed like a good zucchini bread recipe would be just the ticket. I've only had the sweet, spicy quick bread type so I went looking for a good recipe in my cookbooks. On the way I found a yeasted on that wasn't sweet and included cheese. It's in Breaking Bread with Father Dominic under the Veggie Bread category. It makes two loaves and the crust gets nice and brown because of all the cheese.

As usual I changed it a bit. Father's version called for caraway seeds and Swiss cheese, but I went with Parmesan cheese and fresh minced basil, plus some pine nuts on top, for a more Mediterranean feel. I used olive oil for the vegetable oil and some 12 grain flour from King Arthur's for part of the flour, both of which added some needed flavor.

It made a lovely, moist bread with a good crumb and great crust.

The cheese isn't a dominant flavor, but you can tell that it's there. The zucchini add moistness and some nice speckles, but very little flavor. Even the basil is a hint, not a hit. It's marvelous freshly cooled, but also good as toast. It's a batter bread. I baked one loaf in a loaf pan and the other in a cast iron skillet. The skillet one had a particularly wonderful bottom crust, but the interior was still quite moist but not gummy. Now that I've made an Asparagus Bread (see June 20th post) that he loooovvved and a Zucchini Cheese Bread that he couldn't stop eating, I think I've made a veggie bread lover out of Sweetie!

And Xam?...he love all baked goods. I tried three times to get a photo of him eating a small piece of this bread, but he scarfed it down so fast that each photo was a black blur...this one is the best!

Guess he likes Zucchini Cheese Bread, too!

I've been missing the weekly wonderful event that is Yeastspotting at Susan's Wild Yeast...no time to even go there and drool over the bread being baked by the fantastic bakers featured there...so it's nice to have an entry again...and time to bake bread. Here is the URL for Susan's blog :http://www.wildyeastblog.com/ Nick at Imafoodblog is the host this time. His URL is: http://www.imafoodblog.com/ . Thanks Nick!!

Yeasted Zucchini Cheese Batter Bread
adapted from a recipe in Breaking Bread with Father Dominic
Yields 2 loaves

2 cups milk at room temperature
1 egg
2 tablespoons olive oil
2 tablespoons granulated sugar
2 packages active dry yeast (1/2 oz)
2 tablespoons minced fresh basil
1/2 teaspoon freshly ground pepper
1/2 tablespoon salt
about 3 cups bread flour, divided
2 cups 12-grain bread flour (or additional plain bread flour), divided
1 1/2 cups grated Parmesan cheese
2 cups shredded zucchini, excess liquid squeezed out in a towel
2 tablespoons pine nuts (optional)

Combine milk, egg, oil, sugar and yeast in a large mixing bowl. Stir until the yeast is completely dissolved. Add the basil, pepper, salt, and 1 cup each of the bread flour and the 12-grain flour. Beat well (about 150 strokes by hand or three minutes with an electric mixer). Stir in the cheese and zucchini. Add another cup of bread flour and cup of 12-grain flour; beat well. Add enough of the remaining bread flour to make a thick batter that is still easy to manage. Stir until all flour is thoroughly incorporated. Use a rubber spatula to make sure there are no pockets of flour on the bottom of the bowl.

Cover with a clean towel and let rise in a warm, draft-free place about 1 hour. Thoroughly grease two 9x5x3-inch loaf pans. Stir the batter down. Divide the batter between pans. It should fill each pan halfway. Cover and let rise about 20 minutes or until dough nearly reaches the top of the pan. If desired, sprinkle about a tablespoon of pine nuts on the top of each loaf just before baking.

While dough is rising, preheat the oven to 375 degrees F. Bake about 45 minutes, or until a cake tester comes out clean and top crust feels solid. Let cool slightly in pans before attempting to remove loaves. Note: If top crust browns too quickly due to the cheese, tent some aluminum foil over it to slow the browning process.

June 20, 2009

Babes Bodacious Asparagus Bread

The Bread Baking Babes have a real winner this time with a delicious, seasonal and unusual Asparagus Bread, chosen by Lien who blogs at Nottie Van Lien's. The recipe is found HERE and I'm making it as a Bread Baking Buddy type person.

There is plenty of green in this bread from the asparagus and from arugula (although I substituted Swiss chard because my garden is producing so much of it I have to use it where ever I can!) but what ties the flavors together is the walnuts. It makes two smallish loaves of a very moist and tender, flavorful and pretty bread.
While it was still a little warm from the oven I cut a slice and gave it to Sweetie. He made appreciative noises, so I asked for a bite. After I took the bite I started to move away from Sweetie and he reminded me that he was only giving me a bite...he really wanted to finish that slice...and about half the loaf with dinner!

One of the things I missed during my travels in May was making bread. Since I've been back it's been hard to find the time, so it was a real pleasure to have my hands in yeast dough again. Don't expect that all of the non-dough ingredients will be totally encased in the dough once it has baked. Having the odd little bit of asparagus or chard peeking out is part of the pleasure for me.

Do give this recipe a try. If you have a stand mixer to do the kneading, it is a simple recipe. The veggies are basically blanched, drained, and chopped. The rest is pretty fun and the results are spectacular!

This is my entry for this week in Susan's event Yeastspotting at Wild Yeast. If you check out last week's entries you will see at least one loaf of this outstanding seasonal bread. You can also visit all of the Babes's sites using the links on Lein's blog.

Want to be a Buddy, too? Lein tells you how and you still have time...the deadline is June 26th!


On the home front, please keep our dear Bakers Dog Xam in your thoughts. He had surgery on Monday for a glandular infection, but will be seeing the vet on Thursday to see if there are other things wrong. Took him on his first walk this week today and he seemed fine if a bit slower than usual. Fingers and toes crossed that the surgery took care of it all.

June 07, 2009

Bacon Makes This Bread Special

Have had very social times since returning from the Emerald Isle. Needed to bring something to a pot luck and also an appetizer to a dinner. This easy recipe filled the bill for both. The dough goes together easily in a bread machine, but you can make it with a stand mixer and dough hook, or stir it together and knead by hand, too. The olive oil adds flavor and suppleness to the dough so it’s easy to work with. Be patient in spreading the dough into the pan. If it resists, let it sit a minute then try again.

Bacon seems to be a hit with most people. Use good quality bacon since there really isn’t a lot of it here. Cook enough to crisp up the fatty parts and don’t be surprised that there will be a lot of fat left in the pan when you drain the cooked bacon bits. They don’t really stay on the bread very well, but you can boost any that fall on the cutting board back onto the cut pieces.

Since I came home to a LOT of Swiss chard and a fair amount of small zucchini, I used some of those in the topping. You could use spinach or arugula instead of the chard and skip the squash, too. If you don’t have small squash, do skip using squash.larger ones have too much water for this recipe. Sauteed onions would be another great topping.

Bacon and Chard Focaccia

1 Recipe Basic Focaccia
4 slices bacon, cut into 1/3 inch lardons
2-3 tablespoons olive oil
4-5 large Swiss chard leaves, washed, dried, and cut in chiffonade (rolled up and thinly sliced)
1 very small zucchini, cut in coins
salt and pepper to taste (I used garlic salt and some pepper)
¼ cup finely grated Parmesan cheese

Follow the directions below for the basic focaccia. Use the larger pan if you like your focaccia less bready.

Drizzle with the 2 – 3 tablespoons of olive oil. (I then spread a thin coat over the whole thing with a pastry brush.

Cook the bacon pieces over high heat until crisp but not burnt. Remove from fat with slotted spoon then drain on paper towel. Sprinkle focaccia with the bacon, Swiss chard, and zucchini, distributing each ingredient as evenly as possible over the pan of dough. Sprinkle with salt and pepper. Sprinkle the Parmesan cheese evenly over all. Place plastic wrap loosly over the top and let rise in a warm place for about an hour.

Remove plastic wrap and bake in a preheated 450 degree oven for 15 – 20 minutes, or until lightly browned.

Can be served warm or cool. Cut into small squares for appetizers, larger pieces to go with a meal.

Basic Focaccia

King Arthur Flour website

Large or Small* Machine

1 cup water, warm
3 tablespoons olive oil
3 cups King Arthur Unbleached All-Purpose OR Unbleached Special Bread Flour
2 teaspoons salt
5 teaspoons italian seasoning, heaping
2 teaspoons active dry yeast
Place all of the ingredients into the pan of your bread machine. Program for Dough or Manual, and press Start.

*If you're using a small (1-pound) bread machine, remove the dough from the machine at the end of the second kneading cycle, and transfer it to a lightly greased bowl to rise for 1 to 1 1/2 hours.

At the end of the cycle, remove the dough from the machine and punch it down. Roll it out to form a rectangle, and transfer it to a cookie sheet, 10 x 15-inch to 12 x 18-inch. Pat the dough into the pan. Make indentations in the dough with your fingertips, about an inch apart, and drizzle sparingly with olive oil.

Let the focaccia rise for half an hour to an hour. This will make a lighter bread. Bake the focaccia in the preheated 450°F oven for 15 to 20 minutes, or until lightly browned. Drizzle with extra-virgin olive oil, and serve. Serves 6 to 10.

Yeastspotting, that wonderful, mouthwatering, inspiring weekly event at Susan's Wild Yeast blog has turned a year old! Happy Birthday!! Sorry I missed the anniversary last week, but this entry will have to do since I wasn't around to bake bread last time. If you love yeast, or just want to enjoy looking at fantastic recipes made with yeast, hurry on over to http://www.wildyeastblog.com/category/yeastspotting !

May 15, 2009

See You Later Alligator


Off to the land of a thousand shades of green...so there will be few if any posts for a while. A little walking, a little putting up the feet and reading.
Happy end of Spring!

May 10, 2009

A Swirl of Many Grains and Raisins

As a little girl one of my favorite snacks was cinnamon toast. Warm bread, lots of butter, plus a healthy dose of cinnamon and sugar...comfort food at it's best. I liked it best with a big mug of hot cocoa. I'd setttle down with a good book and time would just slip away.

Lots of people my age can tell you the exact words of commercial jingles from television, even though it was decades ago. I'm a cultural misfit because afte I was about 8 years old we didn't have a working television. One day it just 'broke' and my Dad took all of us who were old enough to get a library card straight to the library. We went back once a week. My younger sister would leave with a stack of books almost as tall as she was and she would plow through them during the week, ready for new ones when we returned last weeks' treasures. I was lucky to finish three books a week, but we all developed a love of reading...or became printaholics...depending on your point of view.

Now that I have the siren song of sourdough starters calling from my fridge, I spend more time baking bread than reading about it. Through trial and error I have figured out the proportions that make the kind of bread I like, so I mostly forget about recipes.

This week I decided to make some raisin bread...something that I love but have not yet tried as a sourdough loaf. The recently arrived order from King Arthur flour included a lovely sack of 12 grain flour. Included are flours of wheat, amaranth, quinoa, sorghum, brown rice,spelt, barley, millet, oats, rye, buckwheat and corn. They add a lot of flavor and some extra nutritional value. The swirl is a combination of butter, brown sugar, cinnamon...lots of cinnamon!...walnuts and, or course, raisins. It is great as is but even better toasted and spread with a bit of butter. Didn't try it yet with hot cocoa, but it was quite enjoyable to eat while reading my latest novel. It would even be good while reading a cereal box...something I've done as a printaholic when no other print was available.


12 Grain Raisin Swirl Sourdough Bread
makes one large loaf

1 cup sourdough starter
1 ¼ cups milk, slightly warm
1 tablespoon molasses (dissolved in the warm milk)
1 egg, slightly beaten or ¼ cup egg substitute
3 cups all-purpose bread flour, divided
1 teaspoon salt
1 cup 12 grain flour mix (I used King Arthur brand)
¼ cup butter, softened
½ cup brown sugar
1 tablespoon cinnamon
½ cup raisins
½ cup chopped walnuts

In the bowl of a stand mixer or a large bowl, mix together the sourdough starter, milk, Molasses, and egg.

In another bowl mix together 2 cups all-purpose bread flour, 1 cup 12 grain flour and the salt. Mix to combine thoroughly.

With dough hook attached to the stand mixer, gradually add the flour mixture to the liquid mixture, letting the mixer dough hook knead at low speed as you add the flour. Once that is all incorporated, continue to add the rest of the all-purpose bread flour until a soft dough forms and the dough ball cleans the sides of the bowl. Continue to knead for 10 minutes. Turn dough out onto a lightly flour surface and gather into a ball, kneading a few times if needed to thoroughly mix the dough.

Place the dough in a lightly oiled bowl or dough rising container, turning the ball to oil all sides. Cover lightly and let rise in a warm place until double in bulk, about 1 ½ hours.

Punch down risen dough and turn out onto a lightly floured surface. Knead a few times, then flatten dough with your hands to about 8” by 10” rectangle. Spread softened butter evenly over the surface, leaving ½ to 1 inch around edges free of butter.

In a small bowl combine the brown sugar and cinnamon. Sprinkle this mixture evenly over the butter.

Evenly sprinkle the raisins, then the walnuts over the cinnamon-sugar mixture on the dough.
Roll up along the long side, jelly-roll fashion. Seal the edges at the end of rolling. Turn under the ends to fit a large bread pan. Lightly oil the bread pan. Place dough, sealed side down, into the bread pan. Cover lightly and let rise until double in bulk, about 1 ½ hours. Preheat oven to 375 degrees F.

Bake risen loaf in preheated oven for about 45 minutes, until top is browned and loaf sounds somewhat hollow when bottom is tapped. Due to the filling it won’t sound a hollow as an unfilled bread loaf.

Remove from pan and cool on a rack. Slice with a serrated knife to serve.

This recipe goes to Tangerine's Kitchen for Bread Baking Day #20 - Multi Grains! It also goes to Susan at Wild Yeast for that wonderous event Yeast Spotting - if you love yeast you should really check it every week!

May 03, 2009

There Are Spicy Biscuits On the Other Blog

Thought I might post about 'em here, but changed my mind. Go on over the Feeding My Enthusiasms for some delightful Spicy Seedy Cheesy Biscuits!