Awesome Bread Babe Tanna at
My Kitchen in Half Cups kindly gave my blog an award and I've been lagging in passing it on. Time to correct that!

For winning the award, I’m suppose to tell you and Tanna 7 things about myself ... beautiful things, interesting things (hopefully), blogging things...perhaps:
One: Baking and cooking provide things to eat and drink, but for me they are a way of being creative.
Two: Recipes are where the creative spark starts for me much of the time. They provide a focus for the ingredients and flavors, a source of proportions of components, essentials like baking temperature. From there my imagination takes flight...sometimes with unexpected results :)
Three: Enthusiasms come and go. I also blog over at Feeding My Enthusiasms and started this blog when my enthusiasm for sourdough was at full spate and dominated my posts. Now it seems that I post here about once a month, although I still bake with sourdough once a week or so.
Four: I love coffee! Can't drink the stuff after about 2 pm if I want to get to sleep at a reasonable hour, but a little decaf is OK. Both kinds go great with a piece of toasted sourdough.
Five: Gardening, especially vegetable gardening, is a passion. My Mom passed on her love of flower growing and my Dad his love of vegetable growing. Even when I lived in an apartment I figured out a way to grow veggies. My favorite Bread Baking Babes recipe was the
asparagus bread.
Six: Meeting bloggers whose blogs you enjoy and admire is very rewarding and special. Have not done the convention settings because you generally don't connect in that kind of setting, but maybe I should try it.
Seven: I have been ver, very fortunate in my family, friends, most jobs, places I've lived and most especially in Sweetie, my husband and I thank God all the time for each of those.
The other part of the award of course is to pass it along to 7 more bloggers - these are beautiful blogs and bloggers, some relatively new to me, some old friends, listed in alpha order:
GIZ AT
EQUAL OPPORTUNITY KITCHEN
JOHANNA AT
GREEN GOURMET GIRAFFELIEN AT
NOTTIE VAN LIENLISA MICHELLE AT
PARSLEY, SAGE, DESSERT AND LINE DRIVESLYNN AT
COOKIE BAKER LYNNMONIQUE AT
LIVING ON BREAD AND WATER TIA AT
BUTTERCREAM BARBIE The garden often takes precedence when time is limited in the spring. It's nice to find a dessert recipe that lets me do other things while it gets ready for baking in its own sweet time!
With strawberry season finally here it’s always fun to think of new ways to serve the luscious, sweet , red, juicy fruit. With sourdough starter in the fridge needing to be fed regularly it’s always a challenge to find a new way to use the toss off.
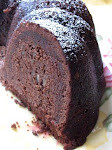
The two came together this week in the form of a sourdough savarin with strawberries and some whipped cream. I have been wanting to make a savarin for years but was never brave enough. It looked complicated, but was actually easy. There was only one minor mishap: I soaked the baked savarin with a sugar syrup that had some grated lemon zest in it. After enjoying my serving I decided that I should have used a sugar syrup that had something with more punch added - like rum or lemencello. The sourdough flavor was dominant and needed the foil of another strong flavor. Any suggestions?
We are still getting strawberries, so I have more opportunities to trick this recipe out with something delicious in the sugar syrup which the savarin soaks up just like a sponge.
Other than the slight lack of balance in the strength of flavors this was a delicious dessert. The cake/bread was moist from the sugar syrup, tender and with just a bit of chewiness. It sank a little bit so I should perhaps have added an additional 1/4 cup flour. The cream and strawberries provided color, texture and flavor contrasts.
I know that Julia, Dorie and David may not have had sourdough in mind when they included their recipe in Baking with Julia, written by Dorie Greenspan with the recipe contributed by David Blom, so I changed it to use the starter.
One of the neat things about making this is that the cook’s time is pretty short. I had lots to do the evening I made it so I ate lunch while the stand mixer did its job. Went grocery shopping while it rose the second time in its ring pan. Made a salad while it baked. Allow more time for it to cool before you douse it liberally with the sugar syrup…and give me some ideas on additions to that syrup, OK?
Since this was a personal challenge, I’m sending it to Lynn of Cookie Baker Lynn for one of my
High Five entries - I Did It!

It’s also going to Susan at Wild Yeast for her weekly wonderful event,
Yeastspotting.
 Sourdough Savarin with Strawberries and Cream
Makes a large savarin ring
The Dough1 cup sourdough starter at room temperature
½ teaspoon instant yeast
½ cup lukewarm water
2 tablespoons sugar
2 large eggs at room temperature
1 cup all purpose flour
4 tablespoons ( 12/ stick) unsalted butter, cut into 8 pieces, at room temperature
Put the sourdough starter, instant yeast, lukewarm water and sugar into the bowl of a stand mixer and stir with a rubber spatula to combine. Put bowl with the mixer fitted with the paddle attachment and add the flour, ¼ cup at a time with mixer on low speed, just until the ingredients are blended. Increase the speed to medium-low and beat for about 8 minutes (see, it was a quick lunch) until the mixture is smooth. Add the butter and beat on low only until the butter is absorbed, 1 – 3 minutes.
Removed bowl from mixer and cover with plastic wrap. Let the dough rise in a warm place (85 – 90 degrees F) for about 15 minutes, just until slightly risen. It will not double. (If your room or rising place is cooler, it may take longer. You are looking for a noticeable increase in volume and a lightness.)
Once dough has risen slightly, brush a ring mold with clarified butter (although I just rubbed the inside surface of my monkey bread pan with soft butter) and fill with the dough. NOTE: If you don’t have a ring mold, you can use a Bundt pan or, probably, and angel food pan or gelatin mold with a center ring.
Cover the mold with plastic wrap and let rise in a very warm place for about 30 minute, or until dough fills the ring mold. (Since my rising place was cooler, each rising took longer…but that way I could get to the grocery store and back AND unpack the groceries while the oven was preheating!)
Position the rack in the upper third of the oven and preheat to 350 degrees F. Carefully put the savarin on a parchment or silicon mat lined jelly roll pan and bake for about 20 minutes, or until it is golden and starts to shrink from the sides of the mold. Unmold onto a cooling rack and cool completely before soaking.
For Soaking and Assembly:Sugar Syrup
2 pints fresh strawberries, washed, hulled and sliced
1 pint heavy cream, whipped with 1 tablespoon of sugar until soft peaks form
Sugar Syrup2 cups water
1 cup sugar
Grated zest from one lemon
(Something stronger??)
Put the water and sugar in a medium saucepan and bring to the boil. Boil for 30 seconds and then turn off the heat.
Line a jelly roll pan with waxed paper and set a cooling rack on tip of it. Place the savarin on the cooling rack. Spoon the hot syrup over the savarin, a few tablespoons at a time, continuing to soak the pastry until it is plump and cannot hold any more liquid.
When ready to serve, slice the savarin into serving portions, place on a plate and spoon on a generous amount of sliced strawberries. Dollop with whipped cream and serve.